December 20, 2011

Christmas Cards Recieved

Yesterday when I reached into the mailbox I saw some card envelopes. I love receiving cards, but these were not for me and this actually made my smile even bigger. These were addressed to Megan and Lauren. They each received 2 cards in the mail yesterday, one each from my grandparents, and one each from my Aunt. It brought me back to my childhood... I remember feeling so special when Grandma and Grandpa sent ME a Christmas card of my very own. I am so thankful that my Grandparents (and Aunt) are continuing on with this tradition, and watching my girls get all excited opening their envelopes is better than receiving a card that has MY name on it.

I think that next year I will take the time to send out Christmas cards to my nieces and nephews as well.

Christmas Album - Gift

This is an album that I made as a gift using the Birthday Occasions Folio tutorial from PaperPhenomenon.com
I actually had to unwrap this gift last night because I wrapped it without recording the video!


December 19, 2011

JYC Catch Up

Ok.. I am just a little (ok, a lot) behind on the Journal Your Christmas entries! So this post is going to be a catch up post with multiple topics. I am still not sure if I will actually print these and make an album, but just in case I get motivated I had better catch up!

The Perfect Gift
Is there such a thing as a perfect gift? I tend to wait until November before I start shopping for gifts, I order the bulk of them online and I always want to find the "perfect" gift for someone. Sometimes I use wishlists (Amazon rocks!) and sometimes I can come up with a great idea on my own. Some gifts are handmade (yeah, I am still working on a couple of those...) but I am always nervous that the recipient will not like it. My goal for the future is to have MOST of the gifts that I give be handmade, but in order for that to occur I have to start working on them in January!

What's for Dinner?
For the Boettcher Family celebration the menu is different every year. We have had Ham, Turkey, Beef Wellington, Tenderloin, Crown Roast and many other options, this year we are actually having brunch. 
On the Frymire side the menu is part of the tradition, and it is pretty much a replica of our Thanksgiving menu. Turkey, sage stuffing, apple salad, orange jello salad, Amanda's homemade noodles, Mom's apple pie etc. 
I love that we have the best of both worlds and get the comfort food as well as getting to try something new!

Brown Paper Packages
I would love to have a huge pile of beautifully wrapped an coordinated gifts under my tree. The reality is a mix of gift bags, decorative sweater boxes, and gifts all in different colors/ patterns with a metallic bow stuck on top. I still have wrapping paper from at least 7 years ago. I tend to follow my Mom's tradition of wrapping each gift in a different paper. I know that I could start from scratch, buy some new paper and have my beautifully coordinated pile of gifts. But there is a part of me that does not want to "waste" the paper that I already have.
My plan for this year is to hit up the after Christmas sales and buy a bunch of pretty gift-wrapping ribbon and coordinating paper and start fresh next year. Lets see if that actually occurs though!

Oh Christmas Tree
I love the smell of a fresh tree, but I hate the mess. We have cats. Cats who like to climb the Christmas tree. I also do not enjoy putting the lights on the tree. Oh, and we now have high ceilings and like a 9 ft tree. So, artificial works for us! Our current tree is only a year old, so I am hoping that we get a few more good years out of it before we have to replace it. Maybe then we will consider getting a real tree. Or not.

A Moment of Clarity
There are a lot of things that I am grateful for this Christmas season. Family and friends are certainly on the top of my list. Both Eric and I have pretty stable jobs, and this year has been tough for some of my friends in the job arena which has made me very thankful for my job, and the career decisions that I made a few years ago.


Happy Birthday Eric!!!

Today is Eric's birthday, and though we celebrated on Friday I thought that I would take a few minutes to journal about our Birthday traditions for Eric. There really is only one.. Butterball Soup. Surprisingly enough I have never taken a picture of this wonderful soup. Even more surprising is the fact that this is one thing that Eric does not know how to make, and it is a recipe from HIS family! His Mom taught me how to make it a few years before she passed away. I am very thankful that I took the time to learn it from her, even though I do not enjoy cooking at all.

It is a Boettcher family tradition to have this soup for birthday dinners. We have modified the tradition a little, since as much as I love Butterball Soup, I prefer Chicken Marsala for MY birthday dinner and we let the girls choose dinner for their birthdays. We still make it, well I still make it, for Eric's birthday and we recently started making it on Judy's birthday as well.

What makes this soup so special? Besides all of the love put into it, there are these yummy little balls of bread, evaporated milk, eggs and butter... aka Butterballs that make an otherwise plain chicken noodle soup really yummy! And the chicken noodle soup is homemade as well, other than the noodles. I refuse to make the noodles when there are perfectly good options already made for me to use! I do have some limits!

This year Eric also requested a Black Forest Gateau out of a German cookbook that Sira gave us. That cake was a pain in the @ss, but it turned out pretty and tasted yummy! Next year I really should take some pictures!

December 15, 2011

Visitors/ Visiting at Christmas

We have a pretty consistent plan in place for spending time with family and friends for Christmas. Christmas eve we spend with Eric's family. This has evolved over the years from a full out formal dinner and then gifts when Judy was alive, to a more casual occasion. It is always more subdued now without Judy there... like something, or someone is missing.

This year it will actually be brunch instead of dinner to work around everyone's obligations. Christmas Eve evening we will go to the 6pm Mass where I will be singing with the choir, and after Mass we will get together with our good friends Dave and Bea and their 2 kids for drinks and appetizers.
Christmas morning is just the 4 of us for breakfast and opening gifts. While we miss Sira all of the time, I think that it will be hardest on Christmas! We do plan to Skype with her Christmas morning though.


Eric has to work at 11 on Christmas Day, so when he leaves for work I will let the kids play for a little while longer and then we will head to my parent's house for our 3rd gift exchange! There are always a lot of people crowded into Mom and Dad's house for Christmas. My grandparents, my parents (of course), the 4 of us, My sister and her husband, my aunt, my brother and his girlfriend, his kids, and even sometimes another niece and nephew.

Christmas for us is all about spending time with family and friends, and I love every minute of it!

December 14, 2011

Playing Santa

It is interesting how different families have different traditions for how to pass out and open gifts on Christmas morning, or whenever your gift exchange occurs.

With Eric's family a couple of people hand out the gifts and everyone opens them all at once. A little chaotic, even with such a small group, and it goes way too quickly. In the past we have tried to institute the one person open a gift at a time, but it rarely lasts long.

For our immediate family gift exchange it is one gift at a time, but this exchange is much smaller so it is easier. 

After all the gifts are opened Christmas morning at home, we go to my parents house for gifts and dinner. At my parents house someone is nominated to play "Santa", they have to wear a Santa hat and pass out the gifts to everyone. This can take a while since we usually have anywhere from 13 - 20 people crammed into my parents living room Christmas day. Last year my parent's exchange student Neila was "Santa" with some help from the kids.

After ALL of the gifts are passed out it is time to open. Youngest goes first, and everyone watches him open his gift before the next youngest goes.. and on and on. With this many people the gift opening/ exchange can last well over an hour. But it is nice because everyone gets to see what everyone else got, and we have an opportunity to thank the giver immediately.
I love our Christmas traditions!

December 9, 2011

Christmas Traditions

My favorite thing about Christmas is all of the family traditions that make everything about the holidays so special! We have many traditions, and I am sure that some of the others will get their own journal entry.. but the one that I want to share today is our annual visit to Crowne Center in Kansas City. 

We visit Santa (disclaimer... all pics are from last year. The ones from last weekend are still on my camera!)

Eat dinner at Fritz's where trains deliver your food to the table

Playing on the "playground"


And Ice Skating!


December 8, 2011

Christmas Card Procrastination

Every year I have full intentions of making some beautiful cards to send to my friends and family at Christmastime. A few years I actually succeeded in this plan... but the last two did not exactly happen the way I had envisioned. I ended up making photo cards instead. Still kinda personal... right?

This year... well this year I had so many ideas floating around in my head and saved on my Pinterest boards. I bought the cutest stamps from Papertrey Ink and said that I would definitly make my cards this year.

It is now the 8th of December, and I have not inked up any of the adorable stamps that I bought. I have not even cut out and scored the cards. Yeah, I know... it is not going to happen. Luckily for me my dear sister sells Stampin' Up, and has monthly make-and-takes at her home. And for the past couple of months she has included at least 1 Christmas card each month. So between those and some extras from previous years I think that I have enough cards to send out this year. I will have to make a couple of special ones, after all I can not send my sister a card that she designed!

(Yes.. I know that I am way behind on my Journal you Christmas entries. I will try to catch up, but no promises!)

December 2, 2011

Oh the weather outside is frightful...

but the fire is so delightful, and since there's no place to go,
let it snow, let it snow, let it snow.

That pretty much sums up my opinion of winter weather.  As long as I do not have to go outside in it, I love snow. Everything looks a little bit magical with a layer of glittery snow covering it, and Christmas just is not the same if it is not a White Christmas.

However... as soon as I have to walk out in it, drive in it, or heaven forbid actually shovel it, my opinion of snow quickly deteriorates. 

I am just not comfortable with a cold nose and ears, and it takes me forever to warm up again! Eric on the other hand loves the snow, and for the most part the girls agree. Of course this means that I am guilted into snowball fights and snow-cave building (ok.. to be honest the snow cave was built while I was at work

Eric is even trying to convince me to move to Wisconsin when we retire! I am still not convinced and have agreed to a compromise that involves traveling somewhere warm from January - March.

(disclaimer... it has not yet snowed in Kansas this winter so these pictures are from 2 years ago. I did shovel snow last year, I promise... no one was brave enough to attempt to capture it on camera though)


December 1, 2011

Journal Your Christmas

I really have been crafting.. but it has all been gifts and I either can not post about it yet,or I just have not taken a picture of it yet since I usually craft at night!
I did want to post about the current "class' that I am taking though, it is Shimelle Laine's "Journal Your Christmas". I have not decided what form this is going to take album-wise, and did not want to get behind so I decided to use my blog!

I am kinda cheating... I decided that I liked Shimelle's Christmas Manifesto so much that I was going to use hers. She did give us permission though!

November 2, 2011

Graphic 45 Halloween Mini

Ok.. after a couple of takes I have my first crafty video to share! I had to use my point and shoot since I do not have the right tripod for my DSLR, and do not own an actual video camera. The way that my craft room is set up made it awkward for me to set up the camera/ tripod, and I ended up blocking the natural light. I think that i have figured out how to set it up next time... but wanted to post this before we got too far beyond Halloween!

October 31, 2011

Halloween 2010 Mini Album.. sneak peek

I finished a paper bag mini that I have been working on for a few weeks, and I want to share it.. but pictures just do not do it justice! I plan to record a quick video of the album soon, but until then here is the cover (minus some gold glimmer mist that I added at the last minute).
I used the paper bag album setup from Kathryn at Life on the Scrap Beach . The only real change is that I closed up all of the "pockets" except for the last page. I did not have enough pictures to use the pockets as well.


First Christmas Gift Done!!

I have actually finished a Christmas gift! I made this with the intention of giving it to one person (and I am not sure if she reads my blog...) but might give it to someone else actually! I found out that another person on my Christmas gift list loves purple, and I am not sure that the originally intended recipient still does. I will make another version for the 1st person though!
All supplies are Papertrey Ink except for the patterned paper that is from my stash (and a couple of years old...)


The small pocket on the inside cover will hold stamps...
and I will include a card or two in each pocket as well..

October 27, 2011

Seashore

Another Disney Cruise layout using the TwoPeasinabucket 4X6 Photo Love course by Shimelle Laine. This time I used the August lesson.. and I LOVE it!
I used the same papers and techniques as I did in my other Disney Cruise album pages

This is what you see when you first look at the page in the album:
And a closer look:  

But when you turn the page you see...

I love this!!! I trimmed the page protector for the first page down (after I had the pages made) and sewed them together on the "stitch" line. I also added a little glossy accents to the ends of the stitching to make sure that it does not come out. I love how many pictures I got onto "1" page. The original sketch used 8 pictures, but I fit 11 on mine!  
Here are the close ups of the inside parts of this layout.

I cut the title on my Cricut using the  Life is a Beach cartridge. I covered it with Zig 2 way glue and sand. I love the texture of the mesh, shells and sand on this page!

Supplies used in my 2011 Disney Cruise Album:

October 14, 2011

First Plane Ride

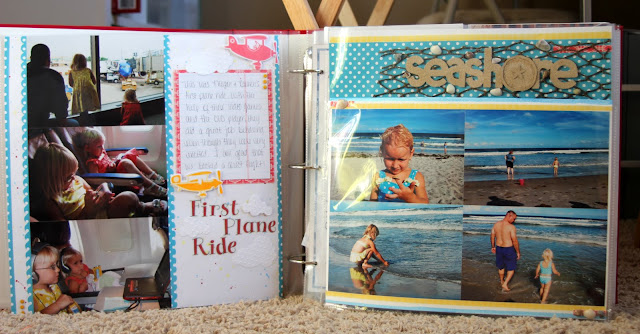
Here is another layout that I made for our Disney Cruise 2009 album. This trip was not only our first cruise, but the first time that the girls were on an airplane! The papers are from the same DCWV stack and the sketch that I used is the March 4x6 Photo Love sketch, just rotated 90 degrees. I die cut and stamped the planes and clouds from the PTI Fly Away stamp set and the Cloud 1 & 2 dies. I embossed the shapes with the cuttlebug dot embossing folder and used SU Dimensionals to pop up some of the clouds and the planes. I used the same paint/ shimmer spray splatter technique as I did on the cover page.


Supplies used in my 2011 Disney Cruise album:


October 5, 2011

Amanda's Birthday Card - 2011

My sister is an amazing crafter, and not just papercrafts. She crochets, quilts, makes jewelry, fused glass.. you name it, she can probably craft it. So of course making her a birthday card is not a simple thing. I have to make a really good card!
I saw this card
                                                                  Source: forum.papertreyink.com via Kelly on Pinterest

on the PTI forum and knew that I wanted to make something similar. I had this adorable glittered paper (I think it is DCWV) already out on my table from another project and I loved the turquoise in it. Amanda's favorite color is blue so I knew that it would work.
As I was gathering my supplies I ran into my first problem. I could have sworn that I had the PTI Star die used in my inspiration card.. but apparently not. So I had to dig through my dies to find another shape that would work. The label from the Tea for Two (I think that is what it is called) set seemed to work the best.

Then I ran into my second problem.. I wanted to cut the die out of both pieces at the same time (obviously) but did not want them adhered yet since I still needed to emboss the background. (As I type this out I wonder why I did not emboss the white first and THEN cut out the shape) So it took 3 tries to get everything cut straight. I intentionally off centered the label, but of course did not realize until it was all put together that it was not off-centered enough to look intentional. Oh well.
So I get everything adhered, outline my image with a marker and go to grab my PTI buttons... and realize that I must have missed ordering the Hawaiian Shores buttons. I am not sure how since I typically order the entire color collection at one time... but nope. No buttons. I pull out my blue bin (I really need to post my revamped storage here soon) and luckily I had some bling in the perfect blue.

So here you go.. not as pretty as the card my sister gave me for my birthday this weekend, but it was made with a lot of love (and took entirely too long!)


September 19, 2011

Sira's Card Box

Sira made quite a few cards while she was here with us, and I decided to make her a box to keep them in. Of course this was a surprise so I had to wait until she received her boxes that we shipped before I could post it!
So... here it is. I had no clue where it was going to end up when I started. I just played around. I love the vintage/ distressed look that resulted, even though it is not typically my style.

Here are the supplies that I used:

And no.. the color is not off in these pictures. That blue PP is the same, the color changed with the Distress Ink, glimmer mist, and the Mod Podge.. but I like it better! Here are some more pictures:

September 13, 2011

2009 Disney Cruise - Cover Page

Ok.. I really have been crafting, I just have not been posting! In 2009 we went on the best vacation ever, a Disney Cruise. We are going again in May and I figured that it was probably time I sat down and finished (ok.. started) our album before I had to do another! The getting started was a struggle for me. I had well over 300 pictures to sort through and group. I finally purchased some 6 up photo sleeves that fit in a 12 x 12 album and arranged all of the pictures by topic in those. Eric and I weeded out a good 200 pictures while watching TV one night. This was a huge boost to my motivation!

The other struggle that I had  was finding patterned paper. I had an overall scheme in mind for the album already. Most of the pictures are very saturated, with a lot of turquoise, red and yellow in them. Taking a queue from Shimelle Laine I decided that all of the pages would be on white CS, have PP accents and have glimmer mist (actual and homemade) splattered on them to keep the album consistent. After looking online, going to an LSS, Hobby Lobby and Michaels I finally found a PP stack with all of the colors I needed from DCWV (Citrus). The only problem was that there was not a 12x12 stack available at Michaels (of course I found it today online...) only an 8x8. So now I have to get creative...

For my cover page I decided to use the 6X8 of us with Mickey in the cruise terminal, and "modified" the sketch from the January 4x6 Photo Love Class by Shimelle and Two Peas in a Bucket.


Supplies used in my 2011 Disney Cruise Album:

August 11, 2011

Go Climb a Tree

Wow.. I know that is has been a while since I have posted. I really have been working on a project (mini album for Lauren's 5th Birthday) but with vacations, sinus/ ear infections (both me and Megan) and general summer activities I have not finished it yet. Last night I was motivated to craft.. but wanted to actually finish something, so I boxed up all of the mini album stuff to clear off my craft table (was pretty smart.. and wrote down the numbers to the stamp sets that I had pulled out so that I could put those away too). While I was at it I gathered a few supplies for other mini albums that I want to do, and put those in boxes too. One for Sira's going away party, and one for our trip to Wisconsin this summer.

Ok.. now to get to the page that I created last night. I recently signed up for the Technique Tuesday: Studio AE Membership because I loved July's stamp set, and had the perfect pictures to go with them!
After pulling out the pictures and the stamp set I knew that I wanted to play with my glimmer mist. So I pulled out a sheet of white cardstock that has a resist (not sure what company.. it was purchased at Archivers), cut a third of it off and started spraying.  I knew how I wanted my pictures laid out, and had a general idea of where the stamps were going to go. I sprayed some scrap white CS with glimmer mist for the title block and accent strips, stamped with Staz-On, and glued/ stapled everything on. 

After everything was done I thought that the page seemed a little unbalanced, and it needed more blue on the top left. I grabbed a scrap of CS (that I had test stamped on) and was moving the Martha Stewart Butterfly Punch around on the scrap trying to find a large enough white spot to punch out when I moved it over the words "the Simple" and thought that it was brilliant! Looking at it now, I know that I have seen this technique before somewhere, probably on Ali's blog, but at the time it was completely original. I sprayed the butterfly with more of the blue glimmer mist (I will come back with the actual glimmer mist colors that I used), positioned it over the title text and knew that my page was complete!

July 14, 2011

Ink Pad Storage

I have been doing some re-organizing in the craft room and figured out how to store my ink pads (for now...). I bought some small drawers from Wal-Mart, and cut some CS to fit in the front of each drawer telling me what color is in each drawer. I have a color book that I made (you can see it to the left of the drawers, it is similar to the Stamp Inventory one that I made) so it is easy to go to the "pink" page (for example), find the shade that I want and then pull it out of the pink drawer. Now, this setup may not work so well when Papertrey Ink releases their new ink-pads.... but it has been so much easier than my previous setup! I also have my blocks, stamp cleaner, positioning tool, re-inkers etc in here for now.

July 13, 2011

Billy's Bday Card

Another quick Papertrey Ink birthday card! This one is for my BIL Billy. When I saw the plane stamps and dies I knew I had to get it for his card (he just got his pilot's license this year)

July 12, 2011

Mom's Birthday card

I had to go with the "tea" theme of Mom's birthday gift that I posted about yesterday so I broke out Papertrey Ink's Tea for Two stamps and teapot die. I used a sheet of the new Damask Designs PP, and used the Damask stamp set, Versamark and clear embossing powder on the Summer Sunrise label, and also on the tea pot.

July 11, 2011

Happy Birthday Mom!

Friday was my Mom's birthday, and we gave her the best birthday present! My Mom has collected teacups for years... browsing Pinterest one day I found this pin, re-pinned it as an idea for Mom and Amanda (my little sis) agreed that it would be a great gift! I talked Mom out of some of her tea-cups, Amanda bought a few more and Billy and Amanda made it happen! I am the idea girl... Amanda executes... we make a perfect team!
This is Mom "unwrapping" her gift (it was covered with a table-cloth)

Billy and Amanda adding the hanging wire:
and a  pic of the clock on the wall in her sun-room (sorry for the flash.. the pic was taken in the evening)


June 25, 2011

PTI Blog Hop - June 2011

For the first time in months... I actually made a card for the PTI Blog Hop

I started with the rainbow color inspiration, combined with Betsy's sentiment focal point idea and came up with this birthday card for my neice. Ink is from SU, everything else is PTI!

June 24, 2011

Father's Day gift for Eric

After seeing this idea on Pinterest I knew that it would be the perfect gift for Eric for Father's Day.
I already had all of the supplies in my stash. The canvas was from Michaels, the tree trunk was cut from my Cricut (Wild Card Cartridge), and the paint is from WalMart (most likely... I have had it forever!) This now sits on the mantel with 2 canvas prints that I gave Eric for Christmas.

June 23, 2011

Father's Day

A little late, but here is the card that I made for my Dad for Father's Day.
I was going for a skywriting look., and though I am not thrilled with the handwritten "Father's Day" I did not like any of the stamp options that I had. Apparently I need more Father's day stamps!

All supplies are Papertry Ink

June 10, 2011

Up Up and Away

I finally broke down and purchased Papertrey Ink's Up Up and Away stamp set (and dies) and could not wait to play with them!  I love the red, white, and light blue color scheme that I have been seeing everywhere, so I pulled out some CS (PTI of course). The clouds are die cut out of a strip of white streamer. I really wanted felt.. but did not have any white so I was looking for something else with texture and opened the drawer with my tulle and streamers in it. Perfect! I added more layers to some to make them thicker (appear closer).
The medium hot air balloon was stamped with PTI Smokey Shadow ink and colored in with my watercolor markers. (I want Copics... but they are just too expensive for me right now), the smallest one was stamped with Momento ink, and the largest was stamped with PTI Pure Poppy ink and then I added a layer of Diamond Glaze for dimension. My intention was to make it look like it was much closer than the other 2 balloons.
Oh. and my sentiment really is straight in person.. the angle that I took the photo at is making it look a little crooked!

May 31, 2011

Stamp Inventory and Storage

I have a lot of stamps from many different companies and many different formats (wood, cling, clear etc) and have some that have never touched ink because I forgot that I had them!
Previously all of my wood mount and cling stamps (mostly SU) were in a Sterlite cart, while my clear stamps were in binders. But then my binder pages started coming out and the wood and cling stamps were neglected. I started to set up a Rolodex style inventory.. but that was too much work to be honest. So this is what I ended up with after going through a lot of blogs and message board posts about stamp organization... and it works for me!

The cover is made out of chipboard that my curtains were folded around and some binder rings:

Inside each stamp set is stamped onto a simple sheet of computer paper (cut in half) and labeled with the Manufacturer, Stamp Name, and a number. (click on image to make it bigger)

The clear stamp sets are in CD or DVD cases depending on size (SU Cling come in DVD cases already, so I purchased some extras for my other large sets). The stamp sheets with just a number tell me that they are in CD cases, a "D" before the number stands for DVD case, and a "W" tells me that it is wood mount. The wood mount stamps are in the SU clam cases and also are numbered, with exception of my wood Christmas stamps which are all together in a small bin.

The CD and DVD cases are in these boxes from Amazon and are stored in a closet behind my workspace. I need to get a couple more boxes!


It is hard to see in the next picture, but here is an example of the numbered CD cases

And the wood stamps are in bins on the same shelf of the closet. 

Eventually I will organize the stamp inventory sheets by category.. but for now it is already so much easier to find my stamps, and I have been using the wood mounts more now that I see them with all of the rest of my stamps!

ETA*** I found the link for the stamp organization that mine is based off of! http://sillyleanndesigns.blogspot.com/2010/12/my-process-and-how-my-organization.html

May 23, 2011

Megan's 6th Birthday Mini Album - Finally!

I started on this mini-album MONTHS ago and just finished it this weekend! I bought a bunch of the American Crafts Dear Lizzy - Spring Collection and started covering a Maya Road mini-album (+ a few extra pages cut from chipboard) with the patterned paper and the fabric "paper". After a few hours spent cutting and adhering I was burnt out and set the project aside. I was finally motivated to work on the album and got pictures and embellishments added! The only supplies NOT American Crafts is the buttons (SU), the "Celebrate" title (KI Memories, scribbles), and misc ribbon from my stash.

  
I only took a couple of pictures of the inside pages... this is not all of them.

May 10, 2011

Mother's Day Gift

Does this count for a Make it Monday challenge if I made it on Sunday? Probably not, but I actually used the Selective Inking technique demonstrated in this week's video! I also stamped inside of my card, though it is not anywhere near as pretty as Erin Lincoln's card.

I purchased these Vera Bradley item's for my Mom for Mother's Day and wanted to make a coordinating card. I used multiple stamp sets (all PTI though) and inks (PTI and Memento) on PTI CS for the floral background. When I was done with the background I was not sure where to put the sentiment...  so I dug through my dies and found the Tea for Two label die (I have never used it...) and it was the perfect size! Then I went through my new stamp catalog (pictures and post on it to come) and found the perfect sentiment, but it was a long one. So, I carefully inked up "Happy" first, when I was done stamping it I cleaned off my stamp real good, and used scotch tape to cover up the "Happy" and "Day" so that I could ink up "Mother's", once the ink was on I peeled off the tape and stamped "Mother's" in the middle. "Day" was easy since it was on the end and I could ink it up on it's own.
Before adding the ribbon and tag I decided that the background needed a little something else, so I broke out my score-tape and some Martha Stewart glitter and made a glitter border around the background. Once the ribbon and tag were adhered, I popped the panel up on SU dimensionals on the card base which was made out of the same PTI CS.
I stamped a little more on the inside of the card and then put everything in a gift bag. I am not really thrilled with how the gift bag turned out, but Mom loved it.