

April 25, 2011
Personality Layout
I can not believe that I forgot to post this last week! I completed another layout using the same layout template as my Sweet Sisters layout. This layout uses the American Crafts: Dear Lizzy Spring Collection from last year


April 14, 2011
Sweet Sisters
This layout was for two challenges. One a personal challenge to use my stash, and one was for the Two Peas in a Bucket 4x6 Photo Love course for March. All paper supplies were from my stash, purchased a couple of years ago at CKC- Kansas City. I think that it was My Minds Eye. The butterfly stamp is from Inkadinkado, circle stamp from Papertrey Ink, Ink from Momento, Butterfly die is from Stampin Up.


April 12, 2011
Megan's 4th Birthday Layout - Revised
Thank you all for your feedback on Megan's Birthday layout! I took your suggestions, and added a pearl blingy swirl to the upper right corner. I did not have the right size/ shape in the clear bling, so the pink pearls had to do. I like it much better now. and bonus.. I think that i found the right spot in my craft room for photographing my layouts!


April 1, 2011
Megan's 4th Birthday Layout
I actually finished a layout this past weekend, but never posted it! I need to figure out the lighting in my craft room, and the best way to photograph my layouts.. but here it is!

I wanted to play around with the clustering look that I love on other people's layouts and this is what I came up with. I made the tulle rosette and added a Papertrey Ink button

And then added more buttons (and bling) next to her name

I think that it needs something else on the top right of the page. It does not feel balanced to me... any suggestions?

I wanted to play around with the clustering look that I love on other people's layouts and this is what I came up with. I made the tulle rosette and added a Papertrey Ink button

And then added more buttons (and bling) next to her name

I think that it needs something else on the top right of the page. It does not feel balanced to me... any suggestions?
March 25, 2011
Kids craft table
A couple of weeks ago I saw a Facebook post about a local school, that had recently been sold, selling off a bunch of furniture. I swung by while Megan was in ballet class and picked up 2 kids desks (classic metal with laminate wood top/ $2.00 each) and a large kids table for $5. This thing has a solid wood top and two cubbies. I had no clue if the table would fit in my craft room, but if not I was only out $5.
I had to do some rearranging (the dresser that was under the ribbon rack is now in one of the closets) but the table fits perfectly! Here are some pictures of the girls working on Birthday cards for a couple of friends.


 The kid's art supplies are in the pink and green bins to the left of their table. I just picked up some round pink storage ottomans (from Target) that are the perfect height for the girls to sit on at this table and will add some more storage to the room.
I had to do some rearranging (the dresser that was under the ribbon rack is now in one of the closets) but the table fits perfectly! Here are some pictures of the girls working on Birthday cards for a couple of friends.


March 14, 2011
Baby Shower Gift
Finally got back in my craft room this weekend in order to make a baby gift for a friend. I stamped these onesies, added some cute little coordinating pants, and made a card. I also gave her a big box of diapers, but you do not need a picture of those! All supplies are Papertrey Ink except for the owl, butterfly and birds stamps.

For the card I used some new dies (Limitless Layers and the Edgers #1 Collection), score-tape and glitter, and layered some ribbon. I wish that I had added something else to the blue layer. Embossing, or maybe some score lines...


For the card I used some new dies (Limitless Layers and the Edgers #1 Collection), score-tape and glitter, and layered some ribbon. I wish that I had added something else to the blue layer. Embossing, or maybe some score lines...

After I wrote my message on the inside you could see the writing under the edge detail (I only cut the front panel) so I added another layer of blue to the bottom of the card. I liked it better the first way... but I still think it looks nice! Next time I am going to cut both edges of the card at the same time so that I do not have to worry about it.

March 3, 2011
New Camera!!!!!
I just got a new toy camera, a Canon 60D! We call it the "boyfriend" (my bestie calls her's her husband.. but I already have one of those). So.. there may not be many crafty posts up the next couple of weeks as I learn how to use my awesome new boyfriend, but there should be lots of pictures! Forgive the quality/ composition/ lighting etc as I learn how to use settings other than "auto" on this amazing camera! Eric took the one of Scout.. I took the rest


February 24, 2011
Die storage
Last night while Eric and the girls were at swim lessons I spent some time in my craft room. I had seen a couple of great ideas for storing the PTI (and other) dies and combined them for my storage.
First I started with Tracey's idea of using magnetic vent covers and cardstock in a photo storage box. I still need to label the cardstock though. I plan on writing the name of the die on the front, and on the back I will list all of the coordinating stamp sets and their respective numbers (new stamp storage coming soon...)

After I had all of my PTI dies on the cards.. I was left with the small Cuttlebug and Sizzix dies. I wanted them in the same place, but they did not stick to the magnets. Then I remembered Dawn's storage idea for the PTI dies. I pulled out the clear acetate sheets that come with the PTI stamps, plugged in my sewing machine, and made pockets!
 Now, I suppose I could have made the pockets for all of the dies, but I loved Tracey's magnet idea and it is so easy to take them on and off... so I continued. I put my embossing plates and folders behind the dies, and even added the Cuttlebug plates and embossing mats.


For my long dies I added some magnet to the side of the box...

And now all of my Cuttlebug supplies are in one spot, with room to grow.

First I started with Tracey's idea of using magnetic vent covers and cardstock in a photo storage box. I still need to label the cardstock though. I plan on writing the name of the die on the front, and on the back I will list all of the coordinating stamp sets and their respective numbers (new stamp storage coming soon...)

After I had all of my PTI dies on the cards.. I was left with the small Cuttlebug and Sizzix dies. I wanted them in the same place, but they did not stick to the magnets. Then I remembered Dawn's storage idea for the PTI dies. I pulled out the clear acetate sheets that come with the PTI stamps, plugged in my sewing machine, and made pockets!


For my long dies I added some magnet to the side of the box...

And now all of my Cuttlebug supplies are in one spot, with room to grow.

February 17, 2011
Mailbox Key
I made this keychain/ tag for our spare mailbox key a while ago. I am not thrilled with it, and may redo it completely... but wanted to post what I made.
The #12 is our mailbox #, and on the back I put our house number in case the key gets lost.
This hangs in our pantry and gets used more frequently than the mailbox key that is on my key chain. Especially since the girls love checking the mail.

 I think that I want to try a more grungy, "Tim Holtz" look on the next one... but that is so outside my comfort zone!
The #12 is our mailbox #, and on the back I put our house number in case the key gets lost.
This hangs in our pantry and gets used more frequently than the mailbox key that is on my key chain. Especially since the girls love checking the mail.


February 16, 2011
Valentines Card
We made up a couple more pencil valentines for some neighbors, and using the same supplies I whipped up this Valentines Card for the grown ups.


Pink CS is from my stash, the PP is from K&Co ( I am almost done using the stack!) The heart/ friend stamp and coordinating heart punch is from Stampin Up, and the Inks are Papertrey Ink.
February 15, 2011
Homework Time
I took these pictures last month, and just realized that I never posted them! All of my girls doing their homework...


February 14, 2011
Make It Monday #1
Papertrey Ink has started a new challenge called "Make it Mondays", and last weeks challenge was to create a Go-To Sentiment card. Click on the button below to check out this weeks challenge!
 Well.. I did not get this posted in time to qualify for the challenge, but I still wanted to show off my card!
All supplies are Papertrey Ink except for the Patterned Paper (DCWV I think...) and the Heidi Swapp flower.

All supplies are Papertrey Ink except for the Patterned Paper (DCWV I think...) and the Heidi Swapp flower.

February 7, 2011
Valentines
This weekend we made Valentines for Megan and Lauren's valentines parties next week. I did not want to wait until the last minute and end up having to buy them. (ummm not that that has ever happened before...)
So, while the girls were watching a movie I got everything prepped. I used the scalloped heart nestabilities to cut out a bunch (50ish) of hearts from a K&Co Valentines paper pack that I bought last year, and then used the next size down to cut out a bunch of white hearts. I also cut a bunch of white CS down to 5 x 2. These were folded and stapled so that it would hold a pencil. I did not take a clear picture of these unfortunately.
Finally I stamped a bunch of hearts in different colors using a SU stamp that my sister was kind enough to let me borrow and then punched them out with the coordinating punch. Once all of this was done I gathered some glue, the pencils (Target and Wal-Mart), a small "Be Mine" stamp, and an ink pad (both Papertrey Ink) and got everything set up on the dining room table.

You can kind of see the folded/ stapled piece in the above picture. This is what the girls wrote the To/ From lines on.

Then they stamped the "Be Mine" sentiment on the white hearts


Then they got to glue together all of the hearts


And then I attached them to the folded backing...

and added the pencils!

So, while the girls were watching a movie I got everything prepped. I used the scalloped heart nestabilities to cut out a bunch (50ish) of hearts from a K&Co Valentines paper pack that I bought last year, and then used the next size down to cut out a bunch of white hearts. I also cut a bunch of white CS down to 5 x 2. These were folded and stapled so that it would hold a pencil. I did not take a clear picture of these unfortunately.
Finally I stamped a bunch of hearts in different colors using a SU stamp that my sister was kind enough to let me borrow and then punched them out with the coordinating punch. Once all of this was done I gathered some glue, the pencils (Target and Wal-Mart), a small "Be Mine" stamp, and an ink pad (both Papertrey Ink) and got everything set up on the dining room table.

Excuse the tablecloth.. this is our craft and playdough tablecloth!
You can kind of see the folded/ stapled piece in the above picture. This is what the girls wrote the To/ From lines on.

Then they stamped the "Be Mine" sentiment on the white hearts


Then they got to glue together all of the hearts


And then I attached them to the folded backing...


February 2, 2011
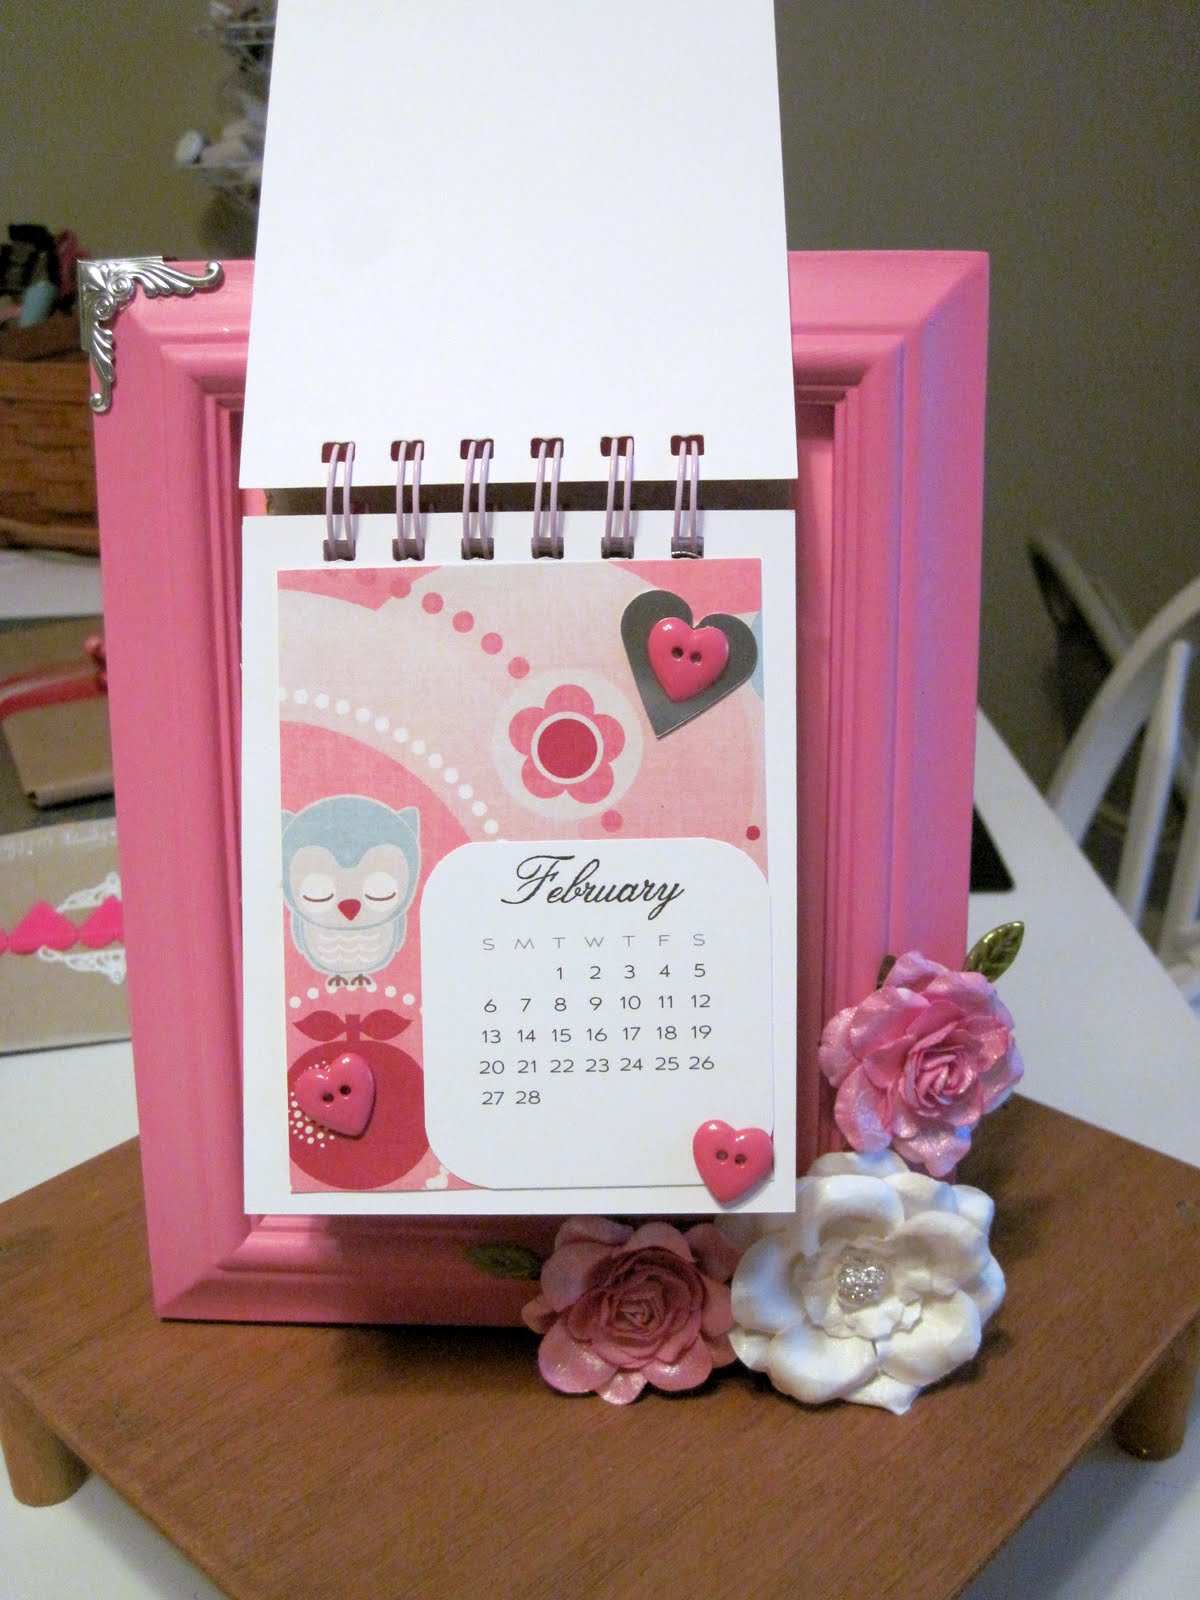
Desk Calendar
I saw this adorable idea on a Zutter Blog Hop and just had to make my own! This is the inspiration:


I painted the frame (previously green) with a paint sample that I had in my stash. The calendar sheets and month stamps are from Papertrey Ink. The flowers are Prima and were sprayed with Glimmer Mist. All of the paper is from my scrap drawers, and the embellishments are from my stash. Most of them I have had for years and never used.
Currently the calendar is adhered to the frame with velcro, but I do not want to tear off the previous months so I am trying to figure out another way to attach the spiral to the frame. Any suggestions? Here are a couple more pages...


And here is my version:

I painted the frame (previously green) with a paint sample that I had in my stash. The calendar sheets and month stamps are from Papertrey Ink. The flowers are Prima and were sprayed with Glimmer Mist. All of the paper is from my scrap drawers, and the embellishments are from my stash. Most of them I have had for years and never used.
Currently the calendar is adhered to the frame with velcro, but I do not want to tear off the previous months so I am trying to figure out another way to attach the spiral to the frame. Any suggestions? Here are a couple more pages...

January 21, 2011
Valentine Decor
I found this frame at the dollar store and knew that I wanted to make some Valentines decor with it.

So I took off the backing
 and gathered my supplies that I wanted to work with. K&Co Paper, Papertrey Ink Felt, Nestabilities scalloped heart die and misc ribbon from my stash.

I cut the paper to 6X6 (the opening is about 5.5 x 5.5) and added my hearts. But I did not like it...

So I grabbed the next size up die and some scrap white cardstock and cut more hearts... much better!

I glued the hearts in place, and used tape to adhere the paper to the frame, and stapled on the ribbon. This way it is easy to change out!

I think that I want to add the word "Love" to the bottom right of the frame. I just need to find the right letters or break out the Cricut to make them!


So I took off the backing


I cut the paper to 6X6 (the opening is about 5.5 x 5.5) and added my hearts. But I did not like it...

So I grabbed the next size up die and some scrap white cardstock and cut more hearts... much better!

I glued the hearts in place, and used tape to adhere the paper to the frame, and stapled on the ribbon. This way it is easy to change out!

I think that I want to add the word "Love" to the bottom right of the frame. I just need to find the right letters or break out the Cricut to make them!

Subscribe to:
Posts (Atom)
